

Mysql
MySQL 高可用架构 之 MHA (Centos 7.5 MySQL 5.7.18 MHA 0.58)
简介
MHA(Master High Availability)目前在MySQL高可用方面是一个相对成熟的解决方案,它由日本DeNA公司youshimaton(现就职于Facebook公司)开发,是一套优秀的作为MySQL高可用性环境下故障切换和主从提升的高可用软件。
SRE实战 互联网时代守护先锋,助力企业售后服务体系运筹帷幄!一键直达领取阿里云限量特价优惠。
在MySQL故障切换过程中,MHA能做到在0~30秒之内自动完成数据库的故障切换操作,并且在进行故障切换的过程中,MHA能在最大程度上保证数据的一致性,以达到真正意义上的高可用。
该软件由两部分组成:
MHA Manager(管理节点)
MHA Node(数据节点)
MHA Manager可以单独部署在一台独立的机器上管理多个master-slave集群,也可以部署在一台slave节点上。
MHA Node运行在每台MySQL服务器上,MHA Manager会定时探测集群中的master节点,当master出现故障时,它可以自动将最新数据的slave提升为新的master,然后将所有其他的slave重新指向新的master。
整个故障转移过程对应用程序完全透明。
可以将MHA工作原理总结为如下
从宕机崩溃的master保存二进制日志事件(binlog events)
识别含有最新更新的slave
应用差异的中继日志(relay log)到其他的slave;
应用从master保存的二进制日志事件(binlog events);
提升一个slave为新的master;
使其他的slave连接新的master进行复制;
Manager工具包
| 组件名称 | 组件说明 |
|---|---|
| masterha_check_ssh | 检查MHA的SSH配置状况 |
| masterha_check_repl | 检查MySQL复制状况 |
| masterha_manger | 启动MHA |
| masterha_check_status | 检测当前MHA运行状态 |
| masterha_master_monitor | 检测master是否宕机 |
| masterha_master_switch | 控制故障转移(自动或者手动) |
| masterha_conf_host | 添加或删除配置的server信息 |
Node工具包
这些工具通常由MHA Manager的脚本触发,无需人为操作
| 组件名称 | 组件说明 |
|---|---|
| save_binary_logs | 保存和复制master的二进制日志 |
| apply_diff_relay_logs | 识别差异的中继日志事件并将其差异的事件应用于其他的slave |
| filter_mysqlbinlog | 去除不必要的ROLLBACK事件(MHA已不再使用这个工具) |
| purge_relay_logs | 清除中继日志(不会阻塞SQL线程) |
注意:
为了尽可能的减少主库硬件损坏宕机造成的数据丢失,因此在配置MHA的同时建议配置成MySQL 5.5的半同步复制。关于半同步复制原理各位自己进行查阅。(不是必须)
环境准备
| 操作系统 | 内核版本 | 主机名 | MySQL 版本 | ip地址 | 角色 |
|---|---|---|---|---|---|
| centos 7.5 | 5.1.3-1.el7 | manager.mha | MySQL 5.7.18 | 10.0.20.200 | Manager |
| centos 7.5 | 5.1.3-1.el7 | node01.mha | MySQL 5.7.18 | 10.0.20.201 | node01 mysql-master |
| centos 7.5 | 5.1.3-1.el7 | node02.mha | MySQL 5.7.18 | 10.0.20.202 | node02 mysql-slave |
| centos 7.5 | 5.1.3-1.el7 | node03.mha | MySQL 5.7.18 | 10.0.20.203 | node03 mysql-slave |
| centos 7.5 | 5.1.3-1.el7 | node04.mha | MySQL 5.7.18 | 10.0.20.204 | node04 mysql-slave |
| MHA Manager 版本 | GitHub下载地址 | 百度网盘下载地址 |
|---|---|---|
| v0.58 | GitHub下载地址 | 百度网盘地址 提取码:lzb0 |
| MHA Node 版本 | GitHub下载地址 | 百度网盘下载地址 |
|---|---|---|
| v0.58 | GitHub下载地址 | 百度网盘地址 提取码:4e6h |
秘钥互信
配置所有机器相互之间
root用户秘钥互信
在所有机器上执行:
生成密钥对
ssh-keygen -t dsa -f ~/.ssh/id_rsa -P ""
推送公钥
ssh-copy-id -i /root/.ssh/id_rsa.pub root@10.0.20.200
ssh-copy-id -i /root/.ssh/id_rsa.pub root@10.0.20.201
ssh-copy-id -i /root/.ssh/id_rsa.pub root@10.0.20.202
ssh-copy-id -i /root/.ssh/id_rsa.pub root@10.0.20.203
ssh-copy-id -i /root/.ssh/id_rsa.pub root@10.0.20.204
此时所有的机器之间以完成互信,无需密码等即可ssh登陆
安装基础依赖包
在所有机器上执行:
yum install -y perl-ExtUtils-CBuilder perl-ExtUtils-MakeMaker perl-CPAN perl-DBD-MySQL perl-Config-Tiny perl-Log-Dispatch perl-Parallel-ForkManager perl-Time-HiRes
安装MHA组件
安装 MHA Node组件
在所有节点上执行
[root@node01 ~]# cd /opt/soft
[root@node01 soft]# ll
total 639152
-rw-r--r-- 1 root root     56220 Jun 12 17:59 mha4mysql-node-0.58.tar.gz
-rw-r--r-- 1 root root 654430368 Jun 11 11:21 mysql-5.7.18-linux-glibc2.5-x86_64.tar.gz
解压安装
具体命令执行输出就不复制出来了
[root@node01 soft]# tar xf mha4mysql-node-0.58.tar.gz
[root@node01 soft]# cd mha4mysql-node-0.58
[root@node01 mha4mysql-node-0.58]# perl Makefile.PL
[root@node01 mha4mysql-node-0.58]# make && make install
Node安装完成后会得到四个工具
[root@node01 mha4mysql-node-0.58]# ll /usr/local/bin/
total 48
-r-xr-xr-x 1 root root 17639 Jun 13 15:00 apply_diff_relay_logs
-r-xr-xr-x 1 root root  4807 Jun 13 15:00 filter_mysqlbinlog
-r-xr-xr-x 1 root root  8337 Jun 13 15:00 purge_relay_logs
-r-xr-xr-x 1 root root  7525 Jun 13 15:00 save_binary_logs
安装 MHA Manager 组件
在 Manager 节点执行安装
不用在Node节点上安装
[root@manager soft]# tar xf mha4mysql-manager-0.58.tar.gz
[root@manager soft]# cd mha4mysql-manager-0.58
[root@manager mha4mysql-manager-0.58]# ls
AUTHORS  bin  COPYING  debian  inc  lib  Makefile.PL  MANIFEST  META.yml  README  rpm  samples  t  tests
[root@manager mha4mysql-manager-0.58]# perl Makefile.PL
[root@manager mha4mysql-manager-0.58]# make && make install
查看 Manager 工具
[root@manager mha4mysql-manager-0.58]# ll /usr/local/bin/
total 88
-r-xr-xr-x 1 root root 17639 Jun 13 15:10 apply_diff_relay_logs
-r-xr-xr-x 1 root root  4807 Jun 13 15:10 filter_mysqlbinlog
-r-xr-xr-x 1 root root  1995 Jun 13 15:13 masterha_check_repl
-r-xr-xr-x 1 root root  1779 Jun 13 15:13 masterha_check_ssh
-r-xr-xr-x 1 root root  1865 Jun 13 15:13 masterha_check_status
-r-xr-xr-x 1 root root  3201 Jun 13 15:13 masterha_conf_host
-r-xr-xr-x 1 root root  2517 Jun 13 15:13 masterha_manager
-r-xr-xr-x 1 root root  2165 Jun 13 15:13 masterha_master_monitor
-r-xr-xr-x 1 root root  2373 Jun 13 15:13 masterha_master_switch
-r-xr-xr-x 1 root root  5172 Jun 13 15:13 masterha_secondary_check
-r-xr-xr-x 1 root root  1739 Jun 13 15:13 masterha_stop
-r-xr-xr-x 1 root root  8337 Jun 13 15:10 purge_relay_logs
-r-xr-xr-x 1 root root  7525 Jun 13 15:10 save_binary_logs
建立 MySQL 一主三从
本文章主要实现是MHA集群,MySQL集群直接贴命令和my.cnf配置
在 四台 Node 节点上,实现,node01 为 master,剩下三个 node 为 slave 。
[root@node01 mysql-5.7]# rpm -qa |grep mariadb | xargs rpm -e --nodeps
[root@node01 soft]# useradd -s /sbin/nologin -M mysql
[root@node01 soft]# tar xf mysql-5.7.18-linux-glibc2.5-x86_64.tar.gz
[root@node01 soft]# mv mysql-5.7.18-linux-glibc2.5-x86_64 mysql-5.7
[root@node01 soft]# mv mysql-5.7 /usr/local/
[root@node01 soft]# ln -s /usr/local/mysql-5.7 /usr/local/mysql
[root@node01 soft]# cd /usr/local/mysql-5.7
[root@node01 mysql-5.7]# echo 'export PATH=$PATH:/usr/local/mysql-5.7/bin' >> /etc/profile
[root@node01 mysql-5.7]# source /etc/profile
[root@node01 mysql-5.7]# mysql -V
mysql  Ver 14.14 Distrib 5.7.18, for linux-glibc2.5 (x86_64) using  EditLine wrapper
[root@node01 mysql-5.7]# cp support-files/mysql.server /etc/init.d/mysqld
[root@node01 mysql-5.7]# sed -i 's@/etc/my.cnf@/usr/local/mysql-5.7/my.cnf@g' /etc/init.d/mysqld
[root@node01 mysql-5.7]# sed -i 's@/usr/local/mysql/data@/opt/mysql_data@g' /etc/init.d/mysqld
[root@node01 mysql-5.7]# chkconfig mysqld on
[root@node01 mysql-5.7]# mkdir /opt/mysql_data
[root@node01 mysql-5.7]# chown -R mysql.mysql /usr/local/mysql-5.7
[root@node01 mysql-5.7]# chown -R mysql.mysql /opt/mysql_data
[root@node01 mysql-5.7]#ln -s /usr/local/mysql/bin/mysqlbinlog /usr/local/bin/mysqlbinlog
[root@node01 mysql-5.7]#ln -s /usr/local/mysql/bin/mysql /usr/local/bin/mysql
my.cnf 配置文件
注意 需要把my.cnf 中的server-id的的值四台node不能重复,否则主从会建立失败。
[root@node04 mysql-5.7]# cat my.cnf
[client]
socket = /tmp/mysql.sock
port=3306

[mysql]
default-character-set=utf8
socket = /tmp/mysql.sock

[mysqld]
socket = /tmp/mysql.sock
character-set-server=utf8
basedir=/usr/local/mysql-5.7
datadir=/opt/mysql_data
port=3306
pid-file=/opt/mysql_data/mysqld.pid

# 四台node不可重复
server-id=204

skip-name-resolve

default-storage-engine=INNODB
explicit_defaults_for_timestamp = true

gtid_mode = on
enforce_gtid_consistency = 1
log_slave_updates = 1

plugin_load = "rpl_semi_sync_master=semisync_master.so;rpl_semi_sync_slave=semisync_slave.so"
loose_rpl_semi_sync_master_enabled = 1
loose_rpl_semi_sync_slave_enabled = 1
loose_rpl_semi_sync_master_timeout = 5000


relay-log = mysql-relay-bin
replicate-wild-ignore-table=mysql.%
replicate-wild-ignore-table=test.%
replicate-wild-ignore-table=information_schema.%

max_connections=2000
query_cache_size=0
table_open_cache=2000
tmp_table_size=246M
thread_cache_size=300
thread_stack = 192k
key_buffer_size=512M
read_buffer_size=4M
read_rnd_buffer_size=32M


innodb_data_home_dir = /opt/mysql_data
innodb_flush_log_at_trx_commit=0
innodb_log_buffer_size=16M

# 此选项修改为实际运行mysql机器内存的%60 - %80
innodb_buffer_pool_size=13G

innodb_log_file_size=128M
innodb_thread_concurrency=128
innodb_autoextend_increment=1000
innodb_buffer_pool_instances=8
innodb_concurrency_tickets=5000
innodb_old_blocks_time=1000
innodb_open_files=300
innodb_stats_on_metadata=0
innodb_file_per_table=1
innodb_checksum_algorithm=0

back_log = 80
flush_time = 0
join_buffer_size = 128M
max_allowed_packet = 1024M
max_connect_errors = 2000
open_files_limit = 4161
query_cache_type = 0
sort_buffer_size = 32M
table_definition_cache = 1400
binlog_row_event_max_size = 8K
sync_master_info = 10000
sync_relay_log = 10000
sync_relay_log_info = 10000
bulk_insert_buffer_size = 64M
interactive_timeout = 120
wait_timeout = 120
log-bin-trust-function-creators=1
sql_mode = NO_ENGINE_SUBSTITUTION,STRICT_TRANS_TABLES

[mysqld_safe]
log-error = /opt/mysql_data/error.log
pid-file = /opt/mysql_data/mysqld.pid
初始化 MySQL
node01
[root@node01 mysql-5.7]# mysqld --initialize  --user=mysql --basedir=/usr/local/mysql-5.7 --datadir=/opt/mysql_data
2019-06-13T07:59:00.947482Z 0 [Warning] TIMESTAMP with implicit DEFAULT value is deprecated. Please use --explicit_defaults_for_timestamp server option (see documentation for more details).
2019-06-13T07:59:01.056859Z 0 [Warning] InnoDB: New log files created, LSN=45790
2019-06-13T07:59:01.076218Z 0 [Warning] InnoDB: Creating foreign key constraint system tables.
2019-06-13T07:59:01.129463Z 0 [Warning] No existing UUID has been found, so we assume that this is the first time that this server has been started. Generating a new UUID: 1ae29152-8db1-11e9-9d54-005056990727.
2019-06-13T07:59:01.129873Z 0 [Warning] Gtid table is not ready to be used. Table 'mysql.gtid_executed' cannot be opened.
2019-06-13T07:59:01.130247Z 1 [Note] A temporary password is generated for root@localhost: 1qGoEiI7ga#U
node02
[root@node02 mysql-5.7]# mysqld --initialize  --user=mysql --basedir=/usr/local/mysql-5.7 --datadir=/opt/mysql_data
2019-06-13T07:59:00.952176Z 0 [Warning] TIMESTAMP with implicit DEFAULT value is deprecated. Please use --explicit_defaults_for_timestamp server option (see documentation for more details).
2019-06-13T07:59:01.092736Z 0 [Warning] InnoDB: New log files created, LSN=45790
2019-06-13T07:59:01.116696Z 0 [Warning] InnoDB: Creating foreign key constraint system tables.
2019-06-13T07:59:01.171324Z 0 [Warning] No existing UUID has been found, so we assume that this is the first time that this server has been started. Generating a new UUID: 1ae8f47b-8db1-11e9-b8bb-0050569972c0.
2019-06-13T07:59:01.171711Z 0 [Warning] Gtid table is not ready to be used. Table 'mysql.gtid_executed' cannot be opened.
2019-06-13T07:59:01.172126Z 1 [Note] A temporary password is generated for root@localhost: qTwtKAOue7:o
node03
[root@node03 mysql-5.7]# mysqld --initialize  --user=mysql --basedir=/usr/local/mysql-5.7 --datadir=/opt/mysql_data
2019-06-13T07:59:00.949924Z 0 [Warning] TIMESTAMP with implicit DEFAULT value is deprecated. Please use --explicit_defaults_for_timestamp server option (see documentation for more details).
2019-06-13T07:59:01.090890Z 0 [Warning] InnoDB: New log files created, LSN=45790
2019-06-13T07:59:01.116166Z 0 [Warning] InnoDB: Creating foreign key constraint system tables.
2019-06-13T07:59:01.171335Z 0 [Warning] No existing UUID has been found, so we assume that this is the first time that this server has been started. Generating a new UUID: 1ae8f4ef-8db1-11e9-b6ae-0050569975f7.
2019-06-13T07:59:01.171753Z 0 [Warning] Gtid table is not ready to be used. Table 'mysql.gtid_executed' cannot be opened.
2019-06-13T07:59:01.172159Z 1 [Note] A temporary password is generated for root@localhost: XIu,h#*HQ5&M
node04
2019-06-13T07:59:00.955598Z 0 [Warning] TIMESTAMP with implicit DEFAULT value is deprecated. Please use --explicit_defaults_for_timestamp server option (see documentation for more details).
2019-06-13T07:59:01.090420Z 0 [Warning] InnoDB: New log files created, LSN=45790
2019-06-13T07:59:01.113972Z 0 [Warning] InnoDB: Creating foreign key constraint system tables.
2019-06-13T07:59:01.166754Z 0 [Warning] No existing UUID has been found, so we assume that this is the first time that this server has been started. Generating a new UUID: 1ae84210-8db1-11e9-b6fe-005056992c6b.
2019-06-13T07:59:01.167145Z 0 [Warning] Gtid table is not ready to be used. Table 'mysql.gtid_executed' cannot be opened.
2019-06-13T07:59:01.167537Z 1 [Note] A temporary password is generated for root@localhost: 26jvaV)XAy>G
执行完初始化操作后,最后会给予root的默认密码,使用此密码登陆后,要第一时间修改root密码,否则不允许操作数据库;
alter user 'root'@'localhost' identified by '123456';
启动MySQL 并简单配置
# /etc/init.d/mysqld start
Starting MySQL.Logging to '/opt/mysql_data/error.log'.
.. SUCCESS!
登陆MySQL 并修改密码
[root@node01 mysql-5.7]# mysql -uroot -p
Enter password:
Welcome to the MySQL monitor.  Commands end with ; or \g.
Your MySQL connection id is 3
Server version: 5.7.18

Copyright (c) 2000, 2017, Oracle and/or its affiliates. All rights reserved.

Oracle is a registered trademark of Oracle Corporation and/or its
affiliates. Other names may be trademarks of their respective
owners.

Type 'help;' or '\h' for help. Type '\c' to clear the current input statement.

mysql> alter user user() identified by "123456";
Query OK, 0 rows affected (0.00 sec)
所有mysql增加主从用户
mysql> grant replication slave on *.* to 'repl'@'10.0.20.%' identified by '123456';
Query OK, 0 rows affected, 1 warning (0.00 sec)

mysql> grant all on *.* to 'root'@'%' identified by '123456';
Query OK, 0 rows affected, 1 warning (0.00 sec)

mysql> flush privileges;
Query OK, 0 rows affected (0.00 sec)
建立 一主三从
node01 的MySQL执行
mysql> show master status;
+------------------+----------+--------------+------------------+-------------------+
| File             | Position | Binlog_Do_DB | Binlog_Ignore_DB | Executed_Gtid_Set |
+------------------+----------+--------------+------------------+-------------------+
| mysql-bin.000002 |      154 |              |                  |                   |
+------------------+----------+--------------+------------------+-------------------+
1 row in set (0.00 sec)
node02、node03、node04 都执行下列语句
change master to master_host='10.0.20.201',master_user='repl',master_password='123456',master_log_file='mysql-bin.000002',master_log_pos=463;
show slave status\G; #查看slave IO和slave sql是否都正常
特别说明
下面开始配置Manager机器,本人的所有机器,均做了bond网卡绑定,所有机器的网卡名都为bond0,大家根据自己的网卡名称自行修改,还有发送邮件的邮箱以及微信公众号的相关配置,均需要修改为自己的。
本次是用vip 是: 10.0.20.199
大家根据自己的情况,做出对应的修改。
MHA Manager 配置
下面配置,均在manager机器上操作。
# 创建MHA配置文件目录
mkdir /etc/mha
# 创建MHA脚本目录
mkdir /etc/mha/scripts
# 创建MHA日志目录
mkdir /var/log/mha/
# 创建日志目录
mkdir /var/log/mha/app1 -p
# 创建日志文件
touch /var/log/mha/app1/manager.log
MHA 配置文件
[root@manager mha]# cat /etc/masterha_default.cnf

[server default]
user=root
password=SIjiayong.123

repl_user=repl
repl_password=SIjiayong.123

ssh_user=root

ping_interval=1
master_binlog_dir=/opt/mysql_data

manager_workdir=/var/log/mha/app1.log
manager_log=/var/log/mha/manager.log
master_ip_failover_script="/etc/mha/scripts/master_ip_failover"
master_ip_online_change_script="/etc/mha/scripts/master_ip_online_change"
report_script="/etc/mha/scripts/send_report"
remote_workdir=/tmp
secondary_check_script= /usr/local/bin/masterha_secondary_check -s 10.0.20.201 -s 10.0.20.202 -s 10.0.20.203 -s 10.0.20.204
shutdown_script=""
[root@manager ~]# cat /etc/mha/app1.cnf
[server1]
hostname=10.0.20.201
port=3306

[server2]
hostname=10.0.20.202
port=3306
candidate_master=1
check_repl_delay=0

[server3]
hostname=10.0.20.203
port=3306

[server4]
hostname=10.0.20.204
port=3306
配置文件说明
MHA主要配置文件说明
manager_workdir=/var/log/masterha/app1.log:设置manager的工作目录
manager_log=/var/log/masterha/app1/manager.log:设置manager的日志文件
master_binlog_dir=/data/mysql:设置master 保存binlog的位置,以便MHA可以找到master的日志
master_ip_failover_script= /usr/local/bin/master_ip_failover:设置自动failover时候的切换脚本
master_ip_online_change_script= /usr/local/bin/master_ip_online_change:设置手动切换时候的切换脚本
user=root:设置监控mysql的用户
password=dayi123:设置监控mysql的用户,需要授权能够在manager节点远程登录
ping_interval=1:设置监控主库,发送ping包的时间间隔,默认是3秒,尝试三次没有回应的时候自动进行railover
remote_workdir=/tmp:设置远端mysql在发生切换时binlog的保存位置
repl_user=repl :设置mysql中用于复制的用户密码
repl_password=replication:设置mysql中用于复制的用户
report_script=/usr/local/send_report:设置发生切换后发送的报警的脚本
shutdown_script="":设置故障发生后关闭故障主机脚本(该脚本的主要作用是关闭主机放在发生脑裂,这里没有使用)
ssh_user=root //设置ssh的登录用户名
candidate_master=1:在节点下设置,设置当前节点为候选的master
slave check_repl_delay=0 :在节点配置下设置,默认情况下如果一个slave落后master 100M的relay logs的话,MHA将不会选择该slave作为一个新的master;这个选项对于对于设置了candidate_master=1的主机非常有用
脚本配置
自动 VIP 管理配置
#为了防止脑裂发生,推荐生产环境采用脚本的方式来管理虚拟 ip,而不是使用 keepalived来完成
vim /etc/mha/scripts/master_ip_failover
#!/usr/bin/env perl

use strict;
use warnings FATAL => 'all';

use Getopt::Long;

my (
    $command,          $ssh_user,        $orig_master_host, $orig_master_ip,
    $orig_master_port, $new_master_host, $new_master_ip,    $new_master_port
);

my $vip = '10.0.20.199/24';
my $key = '1';
my $ssh_start_vip = "/sbin/ifconfig bond0:$key $vip";
my $ssh_stop_vip = "/sbin/ifconfig bond0:$key down";

GetOptions(
    'command=s'          => \$command,
    'ssh_user=s'         => \$ssh_user,
    'orig_master_host=s' => \$orig_master_host,
    'orig_master_ip=s'   => \$orig_master_ip,
    'orig_master_port=i' => \$orig_master_port,
    'new_master_host=s'  => \$new_master_host,
    'new_master_ip=s'    => \$new_master_ip,
    'new_master_port=i'  => \$new_master_port,
);

exit &main();

sub main {

    print "\n\nIN SCRIPT TEST====$ssh_stop_vip==$ssh_start_vip===\n\n";

    if ( $command eq "stop" || $command eq "stopssh" ) {

        my $exit_code = 1;
        eval {
            print "Disabling the VIP on old master: $orig_master_host \n";
            &stop_vip();
            $exit_code = 0;
        };
        if ($@) {
            warn "Got Error: $@\n";
            exit $exit_code;
        }
        exit $exit_code;
    }
    elsif ( $command eq "start" ) {

        my $exit_code = 10;
        eval {
            print "Enabling the VIP - $vip on the new master - $new_master_host \n";
            &start_vip();
            $exit_code = 0;
        };
        if ($@) {
            warn $@;
            exit $exit_code;
        }
        exit $exit_code;
    }
    elsif ( $command eq "status" ) {
        print "Checking the Status of the script.. OK \n";
        exit 0;
    }
    else {
        &usage();
        exit 1;
    }
}

sub start_vip() {
    `ssh $ssh_user\@$new_master_host \" $ssh_start_vip \"`;
}
sub stop_vip() {
     return 0  unless  ($ssh_user);
    `ssh $ssh_user\@$orig_master_host \" $ssh_stop_vip \"`;
}

sub usage {
    print
    "Usage: master_ip_failover --command=start|stop|stopssh|status --orig_master_host=host --orig_master_ip=ip --orig_master_port=port --new_master_host=host --new_master_ip=ip --new_master_port=port\n";
}
配置邮件和微信报警脚本
# 安装发送邮件的工具
yum install mailx -y
mail邮件发送程序,需要先配置好发送这信息
vim /etc/mail.rc
set from=*****@163.com
set smtp=smtp.163.com
set smtp-auth-user=*****
#拿163邮箱来说这个不是密码,而是授权码
set smtp-auth-password=*****
set smtp-auth=login
这是具体的邮件和微信发送脚本
vim /etc/mha/scripts/send_report
#!/bin/bash
source /root/.bash_profile
# 解析变量
orig_master_host=`echo "$1" | awk -F = '{print $2}'`
new_master_host=`echo "$2" | awk -F = '{print $2}'`
new_slave_hosts=`echo "$3" | awk -F = '{print $2}'`
subject=`echo "$4" | awk -F = '{print $2}'`
body=`echo "$5" | awk -F = '{print $2}'`
#定义收件人地址
email="***@***.com"

# 下面这俩个需要微信公众号中自行获取
CropID='******************'
Secret='***************************************'

GURL="https://qyapi.weixin.qq.com/cgi-bin/gettoken?corpid=$CropID&corpsecret=$Secret"
Gtoken=$(/usr/bin/curl -s -G $GURL | awk -F\" '{print $10}')

PURL="https://qyapi.weixin.qq.com/cgi-bin/message/send?access_token=$Gtoken"

function body() {
        #企业号中的应用id
        local int AppID=1000002
        #部门成员id,
        local UserID=$1
        #部门id,定义了范围,组内成员都可接收到消息
        local PartyID='2|3'
        #过滤出zabbix传递的第三个参数
        local Msg=$(echo "$@" | cut -d" " -f3-)
        printf '{\n'
        printf '\t"touser": "'"$UserID"\"",\n"
        printf '\t"toparty": "'"$PartyID"\"",\n"
        printf '\t"msgtype": "text",\n'
        printf '\t"agentid": "'" $AppID "\"",\n"
        printf '\t"text": {\n'
        printf '\t\t"content": "'"$Msg"\""\n"
        printf '\t},\n'
        printf '\t"safe":"0"\n'
        printf '}\n'
}


tac /var/log/mha/app1/manager.log | sed -n 2p | grep 'successfully' > /dev/null
if [ $? -eq 0 ]
	then
	messages=`echo -e "MHA $subject 主从切换成功\n master:$orig_master_host --> $new_master_host \n $body \n 当前从库:$new_slave_hosts"`
	echo "$messages" | mail -s "Mysql 实例宕掉,MHA $subject 切换成功" $email >>/tmp/mailx.log 2>&1
        /usr/bin/curl --data-ascii "$(body 1 1 ${messages})" ${PURL}
	else
	messages=`echo -e "MHA $subject 主从切换失败\n master:$orig_master_host --> $new_master_host \n $body" `
	echo "$messages" | mail -s ""Mysql 实例宕掉,MHA $subject 切换失败"" $email >>/tmp/mailx.log 2>&1
        /usr/bin/curl --data-ascii "$(body 1 1 ${messages})" ${PURL}
fi
手动 VIP 管理配置脚本
vim /etc/mha/scripts/master_ip_online_change
#!/bin/bash
source /root/.bash_profile

vip=`echo '10.0.20.199/24'`  #设置VIP
key=`echo '1'`

command=`echo "$1" | awk -F = '{print $2}'`
orig_master_host=`echo "$2" | awk -F = '{print $2}'`
new_master_host=`echo "$7" | awk -F = '{print $2}'`
orig_master_ssh_user=`echo "${12}" | awk -F = '{print $2}'`
new_master_ssh_user=`echo "${13}" | awk -F = '{print $2}'`

#要求服务的网卡识别名一样
stop_vip=`echo "ssh root@$orig_master_host /usr/sbin/ifconfig bond0:$key down"`
start_vip=`echo "ssh root@$new_master_host /usr/sbin/ifconfig bond0:$key $vip"`

if [ $command = 'stop' ]
  then
    echo -e "\n\n\n****************************\n"
    echo -e "Disabled thi VIP - $vip on old master: $orig_master_host \n"
    $stop_vip
    if [ $? -eq 0 ]
      then
	echo "Disabled the VIP successfully"
      else
	echo "Disabled the VIP failed"
    fi
    echo -e "***************************\n\n\n"
  fi

if [ $command = 'start' -o $command = 'status' ]
  then
    echo -e "\n\n\n*************************\n"
    echo -e "Enabling the VIP - $vip on new master: $new_master_host \n"
    $start_vip
    if [ $? -eq 0 ]
      then
	echo "Enabled the VIP successfully"
      else
	echo "Enabled the VIP failed"
    fi
    echo -e "***************************\n\n\n"
fi
赋权
最后给刚刚配置的三个脚本增加执行权限
chmod +x /etc/mha/scripts/master_ip_failover
chmod +x /etc/mha/scripts/master_ip_online_change
chmod +x /etc/mha/scripts/send_report
验证 MHA 相关操作
验证 ssh 信任登录是否成功
通过 masterha_check_ssh 命令验证
[root@manager scripts]# masterha_check_ssh --conf=/etc/mha/app1.cnf
# 最后出现以下提示,则表示通过
Thu Jun 13 17:19:34 2019 - [info] All SSH connection tests passed successfully.
验证 mysql 主从复制是否成功
通过 masterha_check_repl 命令验证
[root@manager mha]# masterha_check_repl --conf=/etc/masterha_default.cnf
# 最后出现以下提示,则表示通过
MySQL Replication Health is OK.
启动 MHA
手动第一次添加vip
本次在node01 上操作
先在node01 的 MySQL master上绑定vip,
只需要在master绑定这一次,以后会自动切换
[root@node01 mysql-5.7]# /usr/sbin/ifconfig bond0:1 10.0.20.199/24
[root@node01 mysql-5.7]# ip a | grep 20
    inet 10.0.20.201/24 brd 10.0.20.255 scope global bond0
    inet 10.0.20.199/24 brd 10.0.20.255 scope global secondary bond0:1
启动
这一步在manager上操作
nohup masterha_manager --conf=/etc/mha/app1.cnf --remove_dead_master_conf --ignore_last_failover < /dev/null > /var/log/mha/app1/manager.log 2>&1 &
检查 MHA 状态
[root@manager mha]# masterha_check_status --conf=/etc/mha/app1.cnf
app1 (pid:4745) is running(0:PING_OK), master:10.0.20.201
MHA 的日志保存在/var/log/masterha/app1/manager.log 下
[root@manager mha]# tailf /var/log/mha/manager.log
#如果最后一行是如下,表明启动成功
Thu Jun 13 17:31:41 2019 - [info] Starting ping health check on 10.0.20.201(10.0.20.201:3306)..
Thu Jun 13 17:31:41 2019 - [info] Ping(SELECT) succeeded, waiting until MySQL doesn't respond..
关闭
若已处于监控状态,需要停掉它
masterha_stop --conf=/etc/mha/app1.cnf
模拟宕机测试
手动停止node01 的 MySQL master,然后查看其它节点情况。
[root@node01 ~]# /etc/init.d/mysqld  stop
Shutting down MySQL............ SUCCESS!
[root@node01 ~]# ip a | grep 20
    inet 10.0.20.201/24 brd 10.0.20.255 scope global bond0
在node02 上查看VIP
[root@node02 ~]# ip a | grep 20
    inet 10.0.20.202/24 brd 10.0.20.255 scope global bond0
    inet 10.0.20.199/24 brd 10.0.20.255 scope global secondary bond0:1
在node03 上查看主从同步状态和地址
[root@node03 ~]# mysql -uroot -p123456 -e "show slave status\G" | egrep 'Master_Host|Slave_IO_Running|Slave_SQL_Running'
mysql: [Warning] Using a password on the command line interface can be insecure.
                  Master_Host: 10.0.20.202
             Slave_IO_Running: Yes
            Slave_SQL_Running: Yes
      Slave_SQL_Running_State: Slave has read all relay log; waiting for more updates
在node04 上查看主从同步状态和地址
[root@node04 ~]# mysql -uroot -p123456 -e "show slave status\G" | egrep 'Master_Host|Slave_IO_Running|Slave_SQL_Running'
mysql: [Warning] Using a password on the command line interface can be insecure.
                  Master_Host: 10.0.20.202
             Slave_IO_Running: Yes
            Slave_SQL_Running: Yes
      Slave_SQL_Running_State: Slave has read all relay log; waiting for more updates
查看Manager日志
[root@manager mha]# tailf manager.log
Fri Jun 14 10:01:03 2019 - [warning] Got error on MySQL select ping: 2006 (MySQL server has gone away)
Fri Jun 14 10:01:03 2019 - [info] Executing SSH check script: exit 0
Fri Jun 14 10:01:03 2019 - [info] Executing secondary network check script: /usr/local/bin/masterha_secondary_check -s 10.0.20.201 -s 10.0.20.202 -s 10.0.20.203 -s 10.0.20.204  --user=root  --master_host=10.0.20.201  --master_ip=10.0.20.201  --master_port=3306 --master_user=root --master_password=123456 --ping_type=SELECT
Fri Jun 14 10:01:03 2019 - [info] HealthCheck: SSH to 10.0.20.201 is reachable.
Monitoring server 10.0.20.201 is reachable, Master is not reachable from 10.0.20.201. OK.
Monitoring server 10.0.20.202 is reachable, Master is not reachable from 10.0.20.202. OK.
Monitoring server 10.0.20.203 is reachable, Master is not reachable from 10.0.20.203. OK.
Fri Jun 14 10:01:04 2019 - [warning] Got error on MySQL connect: 2003 (Can't connect to MySQL server on '10.0.20.201' (111))
Fri Jun 14 10:01:04 2019 - [warning] Connection failed 2 time(s)..
Monitoring server 10.0.20.204 is reachable, Master is not reachable from 10.0.20.204. OK.
Fri Jun 14 10:01:04 2019 - [info] Master is not reachable from all other monitoring servers. Failover should start.
Fri Jun 14 10:01:05 2019 - [warning] Got error on MySQL connect: 2003 (Can't connect to MySQL server on '10.0.20.201' (111))
Fri Jun 14 10:01:05 2019 - [warning] Connection failed 3 time(s)..
Fri Jun 14 10:01:06 2019 - [warning] Got error on MySQL connect: 2003 (Can't connect to MySQL server on '10.0.20.201' (111))
Fri Jun 14 10:01:06 2019 - [warning] Connection failed 4 time(s)..
Fri Jun 14 10:01:06 2019 - [warning] Master is not reachable from health checker!
Fri Jun 14 10:01:06 2019 - [warning] Master 10.0.20.201(10.0.20.201:3306) is not reachable!
Fri Jun 14 10:01:06 2019 - [warning] SSH is reachable.
Fri Jun 14 10:01:06 2019 - [info] Connecting to a master server failed. Reading configuration file /etc/masterha_default.cnf and /etc/mha/app1.cnf again, and trying to connect to all servers to check server status..
Fri Jun 14 10:01:06 2019 - [info] Reading default configuration from /etc/masterha_default.cnf..
Fri Jun 14 10:01:06 2019 - [info] Reading application default configuration from /etc/mha/app1.cnf..
Fri Jun 14 10:01:06 2019 - [info] Reading server configuration from /etc/mha/app1.cnf..
Fri Jun 14 10:01:07 2019 - [info] GTID failover mode = 1
Fri Jun 14 10:01:07 2019 - [info] Dead Servers:
Fri Jun 14 10:01:07 2019 - [info]   10.0.20.201(10.0.20.201:3306)
Fri Jun 14 10:01:07 2019 - [info] Alive Servers:
Fri Jun 14 10:01:07 2019 - [info]   10.0.20.202(10.0.20.202:3306)
Fri Jun 14 10:01:07 2019 - [info]   10.0.20.203(10.0.20.203:3306)
Fri Jun 14 10:01:07 2019 - [info]   10.0.20.204(10.0.20.204:3306)
Fri Jun 14 10:01:07 2019 - [info] Alive Slaves:
Fri Jun 14 10:01:07 2019 - [info]   10.0.20.202(10.0.20.202:3306)  Version=5.7.18-log (oldest major version between slaves) log-bin:enabled
Fri Jun 14 10:01:07 2019 - [info]     GTID ON
Fri Jun 14 10:01:07 2019 - [info]     Replicating from 10.0.20.201(10.0.20.201:3306)
Fri Jun 14 10:01:07 2019 - [info]     Primary candidate for the new Master (candidate_master is set)
Fri Jun 14 10:01:07 2019 - [info]   10.0.20.203(10.0.20.203:3306)  Version=5.7.18-log (oldest major version between slaves) log-bin:enabled
Fri Jun 14 10:01:07 2019 - [info]     GTID ON
Fri Jun 14 10:01:07 2019 - [info]     Replicating from 10.0.20.201(10.0.20.201:3306)
Fri Jun 14 10:01:07 2019 - [info]   10.0.20.204(10.0.20.204:3306)  Version=5.7.18-log (oldest major version between slaves) log-bin:enabled
Fri Jun 14 10:01:07 2019 - [info]     GTID ON
Fri Jun 14 10:01:07 2019 - [info]     Replicating from 10.0.20.201(10.0.20.201:3306)
Fri Jun 14 10:01:07 2019 - [info] Checking slave configurations..
Fri Jun 14 10:01:07 2019 - [info]  read_only=1 is not set on slave 10.0.20.202(10.0.20.202:3306).
Fri Jun 14 10:01:07 2019 - [info]  read_only=1 is not set on slave 10.0.20.203(10.0.20.203:3306).
Fri Jun 14 10:01:07 2019 - [info]  read_only=1 is not set on slave 10.0.20.204(10.0.20.204:3306).
Fri Jun 14 10:01:07 2019 - [info] Checking replication filtering settings..
Fri Jun 14 10:01:07 2019 - [info]  Replication filtering check ok.
Fri Jun 14 10:01:07 2019 - [info] Master is down!
Fri Jun 14 10:01:07 2019 - [info] Terminating monitoring script.
Fri Jun 14 10:01:07 2019 - [info] Got exit code 20 (Master dead).
Fri Jun 14 10:01:07 2019 - [info] MHA::MasterFailover version 0.58.
Fri Jun 14 10:01:07 2019 - [info] Starting master failover.
Fri Jun 14 10:01:07 2019 - [info]
Fri Jun 14 10:01:07 2019 - [info] * Phase 1: Configuration Check Phase..
Fri Jun 14 10:01:07 2019 - [info]
Fri Jun 14 10:01:08 2019 - [info] GTID failover mode = 1
Fri Jun 14 10:01:08 2019 - [info] Dead Servers:
Fri Jun 14 10:01:08 2019 - [info]   10.0.20.201(10.0.20.201:3306)
Fri Jun 14 10:01:08 2019 - [info] Checking master reachability via MySQL(double check)...
Fri Jun 14 10:01:08 2019 - [info]  ok.
Fri Jun 14 10:01:08 2019 - [info] Alive Servers:
Fri Jun 14 10:01:08 2019 - [info]   10.0.20.202(10.0.20.202:3306)
Fri Jun 14 10:01:08 2019 - [info]   10.0.20.203(10.0.20.203:3306)
Fri Jun 14 10:01:08 2019 - [info]   10.0.20.204(10.0.20.204:3306)
Fri Jun 14 10:01:08 2019 - [info] Alive Slaves:
Fri Jun 14 10:01:08 2019 - [info]   10.0.20.202(10.0.20.202:3306)  Version=5.7.18-log (oldest major version between slaves) log-bin:enabled
Fri Jun 14 10:01:08 2019 - [info]     GTID ON
Fri Jun 14 10:01:08 2019 - [info]     Replicating from 10.0.20.201(10.0.20.201:3306)
Fri Jun 14 10:01:08 2019 - [info]     Primary candidate for the new Master (candidate_master is set)
Fri Jun 14 10:01:08 2019 - [info]   10.0.20.203(10.0.20.203:3306)  Version=5.7.18-log (oldest major version between slaves) log-bin:enabled
Fri Jun 14 10:01:08 2019 - [info]     GTID ON
Fri Jun 14 10:01:08 2019 - [info]     Replicating from 10.0.20.201(10.0.20.201:3306)
Fri Jun 14 10:01:08 2019 - [info]   10.0.20.204(10.0.20.204:3306)  Version=5.7.18-log (oldest major version between slaves) log-bin:enabled
Fri Jun 14 10:01:08 2019 - [info]     GTID ON
Fri Jun 14 10:01:08 2019 - [info]     Replicating from 10.0.20.201(10.0.20.201:3306)
Fri Jun 14 10:01:08 2019 - [info] Starting GTID based failover.
Fri Jun 14 10:01:08 2019 - [info]
Fri Jun 14 10:01:08 2019 - [info] ** Phase 1: Configuration Check Phase completed.
Fri Jun 14 10:01:08 2019 - [info]
Fri Jun 14 10:01:08 2019 - [info] * Phase 2: Dead Master Shutdown Phase..
Fri Jun 14 10:01:08 2019 - [info]
Fri Jun 14 10:01:08 2019 - [info] Forcing shutdown so that applications never connect to the current master..
Fri Jun 14 10:01:08 2019 - [info] Executing master IP deactivation script:
Fri Jun 14 10:01:08 2019 - [info]   /etc/mha/scripts/master_ip_failover --orig_master_host=10.0.20.201 --orig_master_ip=10.0.20.201 --orig_master_port=3306 --command=stopssh --ssh_user=root


IN SCRIPT TEST====/sbin/ifconfig bond0:1 down==/sbin/ifconfig bond0:1 10.0.20.199/24===

Disabling the VIP on old master: 10.0.20.201
Fri Jun 14 10:01:08 2019 - [info]  done.
Fri Jun 14 10:01:08 2019 - [warning] shutdown_script is not set. Skipping explicit shutting down of the dead master.
Fri Jun 14 10:01:08 2019 - [info] * Phase 2: Dead Master Shutdown Phase completed.
Fri Jun 14 10:01:08 2019 - [info]
Fri Jun 14 10:01:08 2019 - [info] * Phase 3: Master Recovery Phase..
Fri Jun 14 10:01:08 2019 - [info]
Fri Jun 14 10:01:08 2019 - [info] * Phase 3.1: Getting Latest Slaves Phase..
Fri Jun 14 10:01:08 2019 - [info]
Fri Jun 14 10:01:08 2019 - [info] The latest binary log file/position on all slaves is mysql-bin.000004:194
Fri Jun 14 10:01:08 2019 - [info] Retrieved Gtid Set: 6211616e-8db3-11e9-be15-005056990727:3-5
Fri Jun 14 10:01:08 2019 - [info] Latest slaves (Slaves that received relay log files to the latest):
Fri Jun 14 10:01:08 2019 - [info]   10.0.20.202(10.0.20.202:3306)  Version=5.7.18-log (oldest major version between slaves) log-bin:enabled
Fri Jun 14 10:01:08 2019 - [info]     GTID ON
Fri Jun 14 10:01:08 2019 - [info]     Replicating from 10.0.20.201(10.0.20.201:3306)
Fri Jun 14 10:01:08 2019 - [info]     Primary candidate for the new Master (candidate_master is set)
Fri Jun 14 10:01:08 2019 - [info]   10.0.20.203(10.0.20.203:3306)  Version=5.7.18-log (oldest major version between slaves) log-bin:enabled
Fri Jun 14 10:01:08 2019 - [info]     GTID ON
Fri Jun 14 10:01:08 2019 - [info]     Replicating from 10.0.20.201(10.0.20.201:3306)
Fri Jun 14 10:01:08 2019 - [info]   10.0.20.204(10.0.20.204:3306)  Version=5.7.18-log (oldest major version between slaves) log-bin:enabled
Fri Jun 14 10:01:08 2019 - [info]     GTID ON
Fri Jun 14 10:01:08 2019 - [info]     Replicating from 10.0.20.201(10.0.20.201:3306)
Fri Jun 14 10:01:08 2019 - [info] The oldest binary log file/position on all slaves is mysql-bin.000004:194
Fri Jun 14 10:01:08 2019 - [info] Retrieved Gtid Set: 6211616e-8db3-11e9-be15-005056990727:3-5
Fri Jun 14 10:01:08 2019 - [info] Oldest slaves:
Fri Jun 14 10:01:08 2019 - [info]   10.0.20.202(10.0.20.202:3306)  Version=5.7.18-log (oldest major version between slaves) log-bin:enabled
Fri Jun 14 10:01:08 2019 - [info]     GTID ON
Fri Jun 14 10:01:08 2019 - [info]     Replicating from 10.0.20.201(10.0.20.201:3306)
Fri Jun 14 10:01:08 2019 - [info]     Primary candidate for the new Master (candidate_master is set)
Fri Jun 14 10:01:08 2019 - [info]   10.0.20.203(10.0.20.203:3306)  Version=5.7.18-log (oldest major version between slaves) log-bin:enabled
Fri Jun 14 10:01:08 2019 - [info]     GTID ON
Fri Jun 14 10:01:08 2019 - [info]     Replicating from 10.0.20.201(10.0.20.201:3306)
Fri Jun 14 10:01:08 2019 - [info]   10.0.20.204(10.0.20.204:3306)  Version=5.7.18-log (oldest major version between slaves) log-bin:enabled
Fri Jun 14 10:01:08 2019 - [info]     GTID ON
Fri Jun 14 10:01:08 2019 - [info]     Replicating from 10.0.20.201(10.0.20.201:3306)
Fri Jun 14 10:01:08 2019 - [info]
Fri Jun 14 10:01:08 2019 - [info] * Phase 3.3: Determining New Master Phase..
Fri Jun 14 10:01:08 2019 - [info]
Fri Jun 14 10:01:08 2019 - [info] Searching new master from slaves..
Fri Jun 14 10:01:08 2019 - [info]  Candidate masters from the configuration file:
Fri Jun 14 10:01:08 2019 - [info]   10.0.20.202(10.0.20.202:3306)  Version=5.7.18-log (oldest major version between slaves) log-bin:enabled
Fri Jun 14 10:01:08 2019 - [info]     GTID ON
Fri Jun 14 10:01:08 2019 - [info]     Replicating from 10.0.20.201(10.0.20.201:3306)
Fri Jun 14 10:01:08 2019 - [info]     Primary candidate for the new Master (candidate_master is set)
Fri Jun 14 10:01:08 2019 - [info]  Non-candidate masters:
Fri Jun 14 10:01:08 2019 - [info]  Searching from candidate_master slaves which have received the latest relay log events..
Fri Jun 14 10:01:08 2019 - [info] New master is 10.0.20.202(10.0.20.202:3306)
Fri Jun 14 10:01:08 2019 - [info] Starting master failover..
Fri Jun 14 10:01:08 2019 - [info]
From:
10.0.20.201(10.0.20.201:3306) (current master)
 +--10.0.20.202(10.0.20.202:3306)
 +--10.0.20.203(10.0.20.203:3306)
 +--10.0.20.204(10.0.20.204:3306)

To:
10.0.20.202(10.0.20.202:3306) (new master)
 +--10.0.20.203(10.0.20.203:3306)
 +--10.0.20.204(10.0.20.204:3306)
Fri Jun 14 10:01:08 2019 - [info]
Fri Jun 14 10:01:08 2019 - [info] * Phase 3.3: New Master Recovery Phase..
Fri Jun 14 10:01:08 2019 - [info]
Fri Jun 14 10:01:08 2019 - [info]  Waiting all logs to be applied..
Fri Jun 14 10:01:08 2019 - [info]   done.
Fri Jun 14 10:01:08 2019 - [info] Getting new master's binlog name and position..
Fri Jun 14 10:01:08 2019 - [info]  mysql-bin.000002:194
Fri Jun 14 10:01:08 2019 - [info]  All other slaves should start replication from here. Statement should be: CHANGE MASTER TO MASTER_HOST='10.0.20.202', MASTER_PORT=3306, MASTER_AUTO_POSITION=1, MASTER_USER='repl', MASTER_PASSWORD='xxx';
Fri Jun 14 10:01:08 2019 - [info] Master Recovery succeeded. File:Pos:Exec_Gtid_Set: mysql-bin.000002, 194, 6211616e-8db3-11e9-be15-005056990727:4-5
Fri Jun 14 10:01:08 2019 - [info] Executing master IP activate script:
Fri Jun 14 10:01:08 2019 - [info]   /etc/mha/scripts/master_ip_failover --command=start --ssh_user=root --orig_master_host=10.0.20.201 --orig_master_ip=10.0.20.201 --orig_master_port=3306 --new_master_host=10.0.20.202 --new_master_ip=10.0.20.202 --new_master_port=3306 --new_master_user='root'   --new_master_password=xxx
Unknown option: new_master_user
Unknown option: new_master_password


IN SCRIPT TEST====/sbin/ifconfig bond0:1 down==/sbin/ifconfig bond0:1 10.0.20.199/24===

Enabling the VIP - 10.0.20.199/24 on the new master - 10.0.20.202
Fri Jun 14 10:01:08 2019 - [info]  OK.
Fri Jun 14 10:01:08 2019 - [info] ** Finished master recovery successfully.
Fri Jun 14 10:01:08 2019 - [info] * Phase 3: Master Recovery Phase completed.
Fri Jun 14 10:01:08 2019 - [info]
Fri Jun 14 10:01:08 2019 - [info] * Phase 4: Slaves Recovery Phase..
Fri Jun 14 10:01:08 2019 - [info]
Fri Jun 14 10:01:08 2019 - [info]
Fri Jun 14 10:01:08 2019 - [info] * Phase 4.1: Starting Slaves in parallel..
Fri Jun 14 10:01:08 2019 - [info]
Fri Jun 14 10:01:08 2019 - [info] -- Slave recovery on host 10.0.20.203(10.0.20.203:3306) started, pid: 2838. Check tmp log /var/log/mha/10.0.20.203_3306_20190614100107.log if it takes time..
Fri Jun 14 10:01:08 2019 - [info] -- Slave recovery on host 10.0.20.204(10.0.20.204:3306) started, pid: 2839. Check tmp log /var/log/mha/10.0.20.204_3306_20190614100107.log if it takes time..
Fri Jun 14 10:01:09 2019 - [info]
Fri Jun 14 10:01:09 2019 - [info] Log messages from 10.0.20.204 ...
Fri Jun 14 10:01:09 2019 - [info]
Fri Jun 14 10:01:08 2019 - [info]  Resetting slave 10.0.20.204(10.0.20.204:3306) and starting replication from the new master 10.0.20.202(10.0.20.202:3306)..
Fri Jun 14 10:01:08 2019 - [info]  Executed CHANGE MASTER.
Fri Jun 14 10:01:08 2019 - [info]  Slave started.
Fri Jun 14 10:01:08 2019 - [info]  gtid_wait(6211616e-8db3-11e9-be15-005056990727:4-5) completed on 10.0.20.204(10.0.20.204:3306). Executed 0 events.
Fri Jun 14 10:01:09 2019 - [info] End of log messages from 10.0.20.204.
Fri Jun 14 10:01:09 2019 - [info] -- Slave on host 10.0.20.204(10.0.20.204:3306) started.
Fri Jun 14 10:01:10 2019 - [info]
Fri Jun 14 10:01:10 2019 - [info] Log messages from 10.0.20.203 ...
Fri Jun 14 10:01:10 2019 - [info]
Fri Jun 14 10:01:08 2019 - [info]  Resetting slave 10.0.20.203(10.0.20.203:3306) and starting replication from the new master 10.0.20.202(10.0.20.202:3306)..
Fri Jun 14 10:01:08 2019 - [info]  Executed CHANGE MASTER.
Fri Jun 14 10:01:09 2019 - [info]  Slave started.
Fri Jun 14 10:01:09 2019 - [info]  gtid_wait(6211616e-8db3-11e9-be15-005056990727:4-5) completed on 10.0.20.203(10.0.20.203:3306). Executed 0 events.
Fri Jun 14 10:01:10 2019 - [info] End of log messages from 10.0.20.203.
Fri Jun 14 10:01:10 2019 - [info] -- Slave on host 10.0.20.203(10.0.20.203:3306) started.
Fri Jun 14 10:01:10 2019 - [info] All new slave servers recovered successfully.
Fri Jun 14 10:01:10 2019 - [info]
Fri Jun 14 10:01:10 2019 - [info] * Phase 5: New master cleanup phase..
Fri Jun 14 10:01:10 2019 - [info]
Fri Jun 14 10:01:10 2019 - [info] Resetting slave info on the new master..
Fri Jun 14 10:01:10 2019 - [info]  10.0.20.202: Resetting slave info succeeded.
Fri Jun 14 10:01:10 2019 - [info] Master failover to 10.0.20.202(10.0.20.202:3306) completed successfully.
Fri Jun 14 10:01:10 2019 - [info] Deleted server1 entry from /etc/mha/app1.cnf .
Fri Jun 14 10:01:10 2019 - [info]

----- Failover Report -----

app1: MySQL Master failover 10.0.20.201(10.0.20.201:3306) to 10.0.20.202(10.0.20.202:3306) succeeded

Master 10.0.20.201(10.0.20.201:3306) is down!

Check MHA Manager logs at manager.mha:/var/log/mha/manager.log for details.

Started automated(non-interactive) failover.
Invalidated master IP address on 10.0.20.201(10.0.20.201:3306)
Selected 10.0.20.202(10.0.20.202:3306) as a new master.
10.0.20.202(10.0.20.202:3306): OK: Applying all logs succeeded.
10.0.20.202(10.0.20.202:3306): OK: Activated master IP address.
10.0.20.204(10.0.20.204:3306): OK: Slave started, replicating from 10.0.20.202(10.0.20.202:3306)
10.0.20.203(10.0.20.203:3306): OK: Slave started, replicating from 10.0.20.202(10.0.20.202:3306)
10.0.20.202(10.0.20.202:3306): Resetting slave info succeeded.
Master failover to 10.0.20.202(10.0.20.202:3306) completed successfully.
Fri Jun 14 10:01:10 2019 - [info] Sending mail..
  % Total    % Received % Xferd  Average Speed   Time    Time     Time  Current
                                 Dload  Upload   Total   Spent    Left  Speed
100   347  100    45  100   302    133    897 --:--:-- --:--:-- --:--:--   898
由上面的日志以及各节点状态看出,vip已经自动漂移到node02的服务器上,并且node02自动提升为主库,node03 和 node04 自动同步node02的库。
同时也收到了微信和邮件告警。
自动切换步骤
从上面的输出可以看出整个 MHA 的切换过程,共包括以下的步骤:
配置文件检查阶段,这个阶段会检查整个集群配置文件配置
宕机的 master 处理,这个阶段包括虚拟 ip 摘除操作,主机关机操作(由于没有定义power_manager脚本,不会关机)
复制 dead maste 和最新 slave 相差的 relay log,并保存到 MHA Manger 具体的目录下
识别含有最新更新的 slave
应用从 master 保存的二进制日志事件(binlog events)(这点信息对于将故障master修复后加入集群很重要)
提升一个 slave 为新的 master 进行复制
使其他的 slave 连接新的 master 进行复制
修复后重新加入集群
切换完成后,关注如下变化:
vip 自动从原来的 master 切换到新的 master,同时,manager 节点的监控进程自动退出。
在日志目录(/var/log/mha/app1)产生一个 app1.failover.complete 文件
/etc/mha/app1.cnf 配置文件中原来老的 master 配置被删除。
模拟宕机的时候,停止了MySQL进程,现在重新启动MySQL,并加入到Node02 的从库中
node02 操作
[root@node02 ~]# mysql -uroot -p123456 -e 'show master status\G'
mysql: [Warning] Using a password on the command line interface can be insecure.
*************************** 1. row ***************************
             File: mysql-bin.000002
         Position: 194
     Binlog_Do_DB:
 Binlog_Ignore_DB:
Executed_Gtid_Set: 6211616e-8db3-11e9-be15-005056990727:4-5
node01 操作
mysql> change master to master_host='10.0.20.202',master_user='repl',master_password='123456',master_log_file='mysql-bin.000002',master_log_pos=194;
Query OK, 0 rows affected, 2 warnings (0.00 sec)

mysql> start slave;
Query OK, 0 rows affected (0.00 sec)
mysql> exit
Bye
[root@node01 ~]# mysql -uroot -p123456 -e "show slave status\G" | egrep 'Master_Host|Slave_IO_Running|Slave_SQL_Running'
mysql: [Warning] Using a password on the command line interface can be insecure.
                  Master_Host: 10.0.20.202
             Slave_IO_Running: Yes
            Slave_SQL_Running: Yes
      Slave_SQL_Running_State: Slave has read all relay log; waiting for more updates
manager 操作
需要注意的是,当发生宕机切换后,manager中的MHA进程会自动停止,在修复后,需要手动再次启动
当发生宕机切换,MHA会自动把宕机的信息从app1.cnf配置文件中删除,修复后机器,要把信息重新写入到app1.cnf中。
修改前
[root@manager mha]# pwd
/etc/mha
[root@manager mha]# cat app1.cnf
[server2]
candidate_master=1
check_repl_delay=0
hostname=10.0.20.202
port=3306

[server3]
hostname=10.0.20.203
port=3306

[server4]
hostname=10.0.20.204
port=3306
修改后
[root@manager mha]# cat app1.cnf
[server1]
candidate_master=1
check_repl_delay=0
hostname=10.0.20.201

[server2]
hostname=10.0.20.202
port=3306

[server3]
hostname=10.0.20.203
port=3306

[server4]
hostname=10.0.20.204
port=3306
重新启动MHA
修改好配置文件后,再次启动MHA即可
nohup masterha_manager --conf=/etc/mha/app1.cnf --remove_dead_master_conf --ignore_last_failover < /dev/null > /var/log/mha/app1/manager.log 2>&1 &
此时修复完成。
在线进行切换
在许多情况下, 需要将现有的主服务器迁移到另外一台服务器上。 比如主服务器硬件故障,RAID 控制卡需要重建,将主服务器移到性能更好的服务器上等等。维护主服务器引起性能下降, 导致停机时间至少无法写入数据。 另外, 阻塞或杀掉当前运行的会话会导致主主之间数据不一致的问题发生。 MHA 提供快速切换和优雅的阻塞写入,这个切换过程只需要 0.5-2s 的时间,这段时间内数据是无法写入的。在很多情况下,0.5-2s 的阻塞写入是可以接受的。因此切换主服务器不需要计划分配维护时间窗口。
MHA在线切换的大概过程:
检测复制设置和确定当前主服务器
确定新的主服务器
阻塞写入到当前主服务器
等待所有从服务器赶上复制
授予写入到新的主服务器
重新设置从服务器
注意,在线切换的时候应用架构需要考虑以下两个问题:
自动识别master和slave的问题(master的机器可能会切换),如果采用了vip的方式,基本可以解决这个问题。
负载均衡的问题(可以定义大概的读写比例,每台机器可承担的负载比例,当有机器离开集群时,需要考虑这个问题)
为了保证数据完全一致性,在最快的时间内完成切换,MHA的在线切换必须满足以下条件才会切换成功,否则会切换失败。
所有slave的IO线程都在运行
所有slave的SQL线程都在运行
所有的show slave status的输出中Seconds_Behind_Master参数小于或者等于running_updates_limit秒,如果在切换过程中不指定running_updates_limit,那么默认情况下running_updates_limit为1秒。
在master端,通过show processlist输出,没有一个更新花费的时间大于running_updates_limit秒。
停止MHA 的manager 监控
[root@manager mha]# masterha_stop --conf=/etc/mha/app1.cnf
Stopped app1 successfully.
[1]+  Exit 1                  nohup masterha_manager --conf=/etc/mha/app1.cnf --remove_dead_master_conf --ignore_last_failover < /dev/null > /var/log/mha/app1/manager.log 2>&1
执行切换命令
进行在线切换操作
模拟在线切换主库操作,原主库10.0.20.202变为slave,10.0.20.201提升为新的主库
上一次进行了模拟宕机测试,最开始的主库是201,切换到了202位主库了
[root@manager mha]# masterha_master_switch --conf=/etc/mha/app1.cnf --master_state=alive --new_master_host=10.0.20.201 --orig_master_is_new_slave --running_updates_limit=10000 --interactive=0
执行后输出的日志如下:
Fri Jun 14 11:30:26 2019 - [info] MHA::MasterRotate version 0.58.
Fri Jun 14 11:30:26 2019 - [info] Starting online master switch..
Fri Jun 14 11:30:26 2019 - [info]
Fri Jun 14 11:30:26 2019 - [info] * Phase 1: Configuration Check Phase..
Fri Jun 14 11:30:26 2019 - [info]
Fri Jun 14 11:30:26 2019 - [info] Reading default configuration from /etc/masterha_default.cnf..
Fri Jun 14 11:30:26 2019 - [info] Reading application default configuration from /etc/mha/app1.cnf..
Fri Jun 14 11:30:26 2019 - [info] Reading server configuration from /etc/mha/app1.cnf..
Fri Jun 14 11:30:27 2019 - [info] GTID failover mode = 1
Fri Jun 14 11:30:27 2019 - [info] Current Alive Master: 10.0.20.202(10.0.20.202:3306)
Fri Jun 14 11:30:27 2019 - [info] Alive Slaves:
Fri Jun 14 11:30:27 2019 - [info]   10.0.20.201(10.0.20.201:3306)  Version=5.7.18-log (oldest major version between slaves) log-bin:enabled
Fri Jun 14 11:30:27 2019 - [info]     GTID ON
Fri Jun 14 11:30:27 2019 - [info]     Replicating from 10.0.20.202(10.0.20.202:3306)
Fri Jun 14 11:30:27 2019 - [info]     Primary candidate for the new Master (candidate_master is set)
Fri Jun 14 11:30:27 2019 - [info]   10.0.20.203(10.0.20.203:3306)  Version=5.7.18-log (oldest major version between slaves) log-bin:enabled
Fri Jun 14 11:30:27 2019 - [info]     GTID ON
Fri Jun 14 11:30:27 2019 - [info]     Replicating from 10.0.20.202(10.0.20.202:3306)
Fri Jun 14 11:30:27 2019 - [info]   10.0.20.204(10.0.20.204:3306)  Version=5.7.18-log (oldest major version between slaves) log-bin:enabled
Fri Jun 14 11:30:27 2019 - [info]     GTID ON
Fri Jun 14 11:30:27 2019 - [info]     Replicating from 10.0.20.202(10.0.20.202:3306)
Fri Jun 14 11:30:27 2019 - [info] Executing FLUSH NO_WRITE_TO_BINLOG TABLES. This may take long time..
Fri Jun 14 11:30:27 2019 - [info]  ok.
Fri Jun 14 11:30:27 2019 - [info] Checking MHA is not monitoring or doing failover..
Fri Jun 14 11:30:27 2019 - [info] Checking replication health on 10.0.20.201..
Fri Jun 14 11:30:27 2019 - [info]  ok.
Fri Jun 14 11:30:27 2019 - [info] Checking replication health on 10.0.20.203..
Fri Jun 14 11:30:27 2019 - [info]  ok.
Fri Jun 14 11:30:27 2019 - [info] Checking replication health on 10.0.20.204..
Fri Jun 14 11:30:27 2019 - [info]  ok.
Fri Jun 14 11:30:27 2019 - [info] 10.0.20.201 can be new master.
Fri Jun 14 11:30:27 2019 - [info]
From:
10.0.20.202(10.0.20.202:3306) (current master)
 +--10.0.20.201(10.0.20.201:3306)
 +--10.0.20.203(10.0.20.203:3306)
 +--10.0.20.204(10.0.20.204:3306)

To:
10.0.20.201(10.0.20.201:3306) (new master)
 +--10.0.20.203(10.0.20.203:3306)
 +--10.0.20.204(10.0.20.204:3306)
 +--10.0.20.202(10.0.20.202:3306)
Fri Jun 14 11:30:27 2019 - [info] Checking whether 10.0.20.201(10.0.20.201:3306) is ok for the new master..
Fri Jun 14 11:30:27 2019 - [info]  ok.
Fri Jun 14 11:30:27 2019 - [info] 10.0.20.202(10.0.20.202:3306): SHOW SLAVE STATUS returned empty result. To check replication filtering rules, temporarily executing CHANGE MASTER to a dummy host.
Fri Jun 14 11:30:27 2019 - [info] 10.0.20.202(10.0.20.202:3306): Resetting slave pointing to the dummy host.
Fri Jun 14 11:30:27 2019 - [info] ** Phase 1: Configuration Check Phase completed.
Fri Jun 14 11:30:27 2019 - [info]
Fri Jun 14 11:30:27 2019 - [info] * Phase 2: Rejecting updates Phase..
Fri Jun 14 11:30:27 2019 - [info]
Fri Jun 14 11:30:27 2019 - [info] Executing master ip online change script to disable write on the current master:
Fri Jun 14 11:30:27 2019 - [info]   /etc/mha/scripts/master_ip_online_change --command=stop --orig_master_host=10.0.20.202 --orig_master_ip=10.0.20.202 --orig_master_port=3306 --orig_master_user='root' --new_master_host=10.0.20.201 --new_master_ip=10.0.20.201 --new_master_port=3306 --new_master_user='root' --orig_master_ssh_user=root --new_master_ssh_user=root   --orig_master_is_new_slave --orig_master_password=xxx --new_master_password=xxx


****************************

Disabled thi VIP - 10.0.20.199/24 on old master: 10.0.20.202

Disabled the VIP successfully
***************************


Fri Jun 14 11:30:27 2019 - [info]  ok.
Fri Jun 14 11:30:27 2019 - [info] Locking all tables on the orig master to reject updates from everybody (including root):
Fri Jun 14 11:30:27 2019 - [info] Executing FLUSH TABLES WITH READ LOCK..
Fri Jun 14 11:30:27 2019 - [info]  ok.
Fri Jun 14 11:30:27 2019 - [info] Orig master binlog:pos is mysql-bin.000002:194.
Fri Jun 14 11:30:27 2019 - [info]  Waiting to execute all relay logs on 10.0.20.201(10.0.20.201:3306)..
Fri Jun 14 11:30:27 2019 - [info]  master_pos_wait(mysql-bin.000002:194) completed on 10.0.20.201(10.0.20.201:3306). Executed 0 events.
Fri Jun 14 11:30:27 2019 - [info]   done.
Fri Jun 14 11:30:27 2019 - [info] Getting new master's binlog name and position..
Fri Jun 14 11:30:27 2019 - [info]  mysql-bin.000005:194
Fri Jun 14 11:30:27 2019 - [info]  All other slaves should start replication from here. Statement should be: CHANGE MASTER TO MASTER_HOST='10.0.20.201', MASTER_PORT=3306, MASTER_AUTO_POSITION=1, MASTER_USER='repl', MASTER_PASSWORD='xxx';
Fri Jun 14 11:30:27 2019 - [info] Executing master ip online change script to allow write on the new master:
Fri Jun 14 11:30:27 2019 - [info]   /etc/mha/scripts/master_ip_online_change --command=start --orig_master_host=10.0.20.202 --orig_master_ip=10.0.20.202 --orig_master_port=3306 --orig_master_user='root' --new_master_host=10.0.20.201 --new_master_ip=10.0.20.201 --new_master_port=3306 --new_master_user='root' --orig_master_ssh_user=root --new_master_ssh_user=root   --orig_master_is_new_slave --orig_master_password=xxx --new_master_password=xxx


*************************

Enabling the VIP - 10.0.20.199/24 on new master: 10.0.20.201

Enabled the VIP successfully
***************************


Fri Jun 14 11:30:27 2019 - [info]  ok.
Fri Jun 14 11:30:27 2019 - [info]
Fri Jun 14 11:30:27 2019 - [info] * Switching slaves in parallel..
Fri Jun 14 11:30:27 2019 - [info]
Fri Jun 14 11:30:27 2019 - [info] -- Slave switch on host 10.0.20.203(10.0.20.203:3306) started, pid: 7081
Fri Jun 14 11:30:27 2019 - [info]
Fri Jun 14 11:30:27 2019 - [info] -- Slave switch on host 10.0.20.204(10.0.20.204:3306) started, pid: 7082
Fri Jun 14 11:30:27 2019 - [info]
Fri Jun 14 11:30:29 2019 - [info] Log messages from 10.0.20.203 ...
Fri Jun 14 11:30:29 2019 - [info]
Fri Jun 14 11:30:27 2019 - [info]  Waiting to execute all relay logs on 10.0.20.203(10.0.20.203:3306)..
Fri Jun 14 11:30:27 2019 - [info]  master_pos_wait(mysql-bin.000002:194) completed on 10.0.20.203(10.0.20.203:3306). Executed 0 events.
Fri Jun 14 11:30:27 2019 - [info]   done.
Fri Jun 14 11:30:27 2019 - [info]  Resetting slave 10.0.20.203(10.0.20.203:3306) and starting replication from the new master 10.0.20.201(10.0.20.201:3306)..
Fri Jun 14 11:30:27 2019 - [info]  Executed CHANGE MASTER.
Fri Jun 14 11:30:28 2019 - [info]  Slave started.
Fri Jun 14 11:30:29 2019 - [info] End of log messages from 10.0.20.203 ...
Fri Jun 14 11:30:29 2019 - [info]
Fri Jun 14 11:30:29 2019 - [info] -- Slave switch on host 10.0.20.203(10.0.20.203:3306) succeeded.
Fri Jun 14 11:30:29 2019 - [info] Log messages from 10.0.20.204 ...
Fri Jun 14 11:30:29 2019 - [info]
Fri Jun 14 11:30:27 2019 - [info]  Waiting to execute all relay logs on 10.0.20.204(10.0.20.204:3306)..
Fri Jun 14 11:30:27 2019 - [info]  master_pos_wait(mysql-bin.000002:194) completed on 10.0.20.204(10.0.20.204:3306). Executed 0 events.
Fri Jun 14 11:30:27 2019 - [info]   done.
Fri Jun 14 11:30:27 2019 - [info]  Resetting slave 10.0.20.204(10.0.20.204:3306) and starting replication from the new master 10.0.20.201(10.0.20.201:3306)..
Fri Jun 14 11:30:27 2019 - [info]  Executed CHANGE MASTER.
Fri Jun 14 11:30:28 2019 - [info]  Slave started.
Fri Jun 14 11:30:29 2019 - [info] End of log messages from 10.0.20.204 ...
Fri Jun 14 11:30:29 2019 - [info]
Fri Jun 14 11:30:29 2019 - [info] -- Slave switch on host 10.0.20.204(10.0.20.204:3306) succeeded.
Fri Jun 14 11:30:29 2019 - [info] Unlocking all tables on the orig master:
Fri Jun 14 11:30:29 2019 - [info] Executing UNLOCK TABLES..
Fri Jun 14 11:30:29 2019 - [info]  ok.
Fri Jun 14 11:30:29 2019 - [info] Starting orig master as a new slave..
Fri Jun 14 11:30:29 2019 - [info]  Resetting slave 10.0.20.202(10.0.20.202:3306) and starting replication from the new master 10.0.20.201(10.0.20.201:3306)..
Fri Jun 14 11:30:29 2019 - [info]  Executed CHANGE MASTER.
Fri Jun 14 11:30:30 2019 - [info]  Slave started.
Fri Jun 14 11:30:30 2019 - [info] All new slave servers switched successfully.
Fri Jun 14 11:30:30 2019 - [info]
Fri Jun 14 11:30:30 2019 - [info] * Phase 5: New master cleanup phase..
Fri Jun 14 11:30:30 2019 - [info]
Fri Jun 14 11:30:30 2019 - [info]  10.0.20.201: Resetting slave info succeeded.
Fri Jun 14 11:30:30 2019 - [info] Switching master to 10.0.20.201(10.0.20.201:3306) completed successfully.
查看状态
node01
[root@node01 ~]# mysql -uroot -p123456 -e 'show slave status\G'
mysql: [Warning] Using a password on the command line interface can be insecure.
[root@node01 ~]# ip a | grep 20
    inet 10.0.20.201/24 brd 10.0.20.255 scope global bond0
    inet 10.0.20.199/24 brd 10.0.20.255 scope global secondary bond0:1
node02
[root@node02 ~]# mysql -uroot -p123456 -e "show slave status\G" | egrep 'Master_Host|Slave_IO_Running|Slave_SQL_Running'
mysql: [Warning] Using a password on the command line interface can be insecure.
                  Master_Host: 10.0.20.201
             Slave_IO_Running: Yes
            Slave_SQL_Running: Yes
      Slave_SQL_Running_State: Slave has read all relay log; waiting for more updates
[root@node02 ~]# ip a | grep 20
    inet 10.0.20.202/24 brd 10.0.20.255 scope global bond0
node03
[root@node03 ~]# mysql -uroot -p123456 -e "show slave status\G" | egrep 'Master_Host|Slave_IO_Running|Slave_SQL_Running'
mysql: [Warning] Using a password on the command line interface can be insecure.
                  Master_Host: 10.0.20.201
             Slave_IO_Running: Yes
            Slave_SQL_Running: Yes
      Slave_SQL_Running_State: Slave has read all relay log; waiting for more updates
node04
[root@node04 ~]# mysql -uroot -p123456 -e "show slave status\G" | egrep 'Master_Host|Slave_IO_Running|Slave_SQL_Running'
mysql: [Warning] Using a password on the command line interface can be insecure.
                  Master_Host: 10.0.20.201
             Slave_IO_Running: Yes
            Slave_SQL_Running: Yes
      Slave_SQL_Running_State: Slave has read all relay log; waiting for more updates
从上面各个数据库的状态可以看出来,主库已经变成了node01了,并且vip也漂移到node01的机器上了。
报错解决
报错一、
报错信息:
Can't locate Parallel/ForkManager.pm in @INC (@INC contains: /usr/local/lib64/perl5 /usr/local/share/perl5 /usr/lib64/perl5/vendor_perl /usr/share/perl5/vendor_perl /usr/lib64/perl5 /usr/share/perl5 .) at /usr/local/share/perl5/MHA/SSHCheck.pm line 31.
BEGIN failed--compilation aborted at /usr/local/share/perl5/MHA/SSHCheck.pm line 31.
Compilation failed in require at /usr/local/bin/masterha_check_ssh line 25.
BEGIN failed--compilation aborted at /usr/local/bin/masterha_check_ssh line 25.
解决:
yum install cpan

cpan Module::Build

# 上面的命令执行完成后,需要重新解压 mha-manager 的包
再次执行

perl Makefile.PL

make
# 这一步中 会提示 输入,都输入yes 回车

make install

相关文章
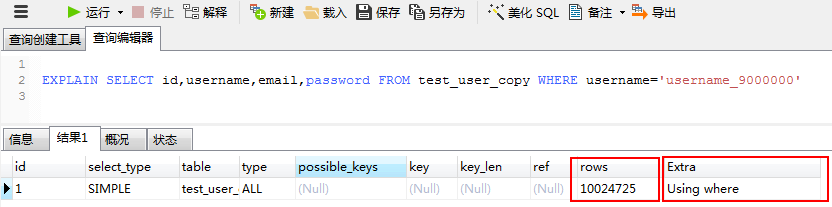
MySQL千万级数据量根据(索引)优化查询速度
一、索引的作用索引通俗来讲就相当于书的目录,当我们根据条件查询的时候,没有索引,便需要全表扫描,数据量少还可以,一旦数据量超过百万甚至千万,一条查询sql执行往往需要几十秒甚至更多,5秒以上就已经让人难以忍受了。提升查询速度的方向一是提升硬...
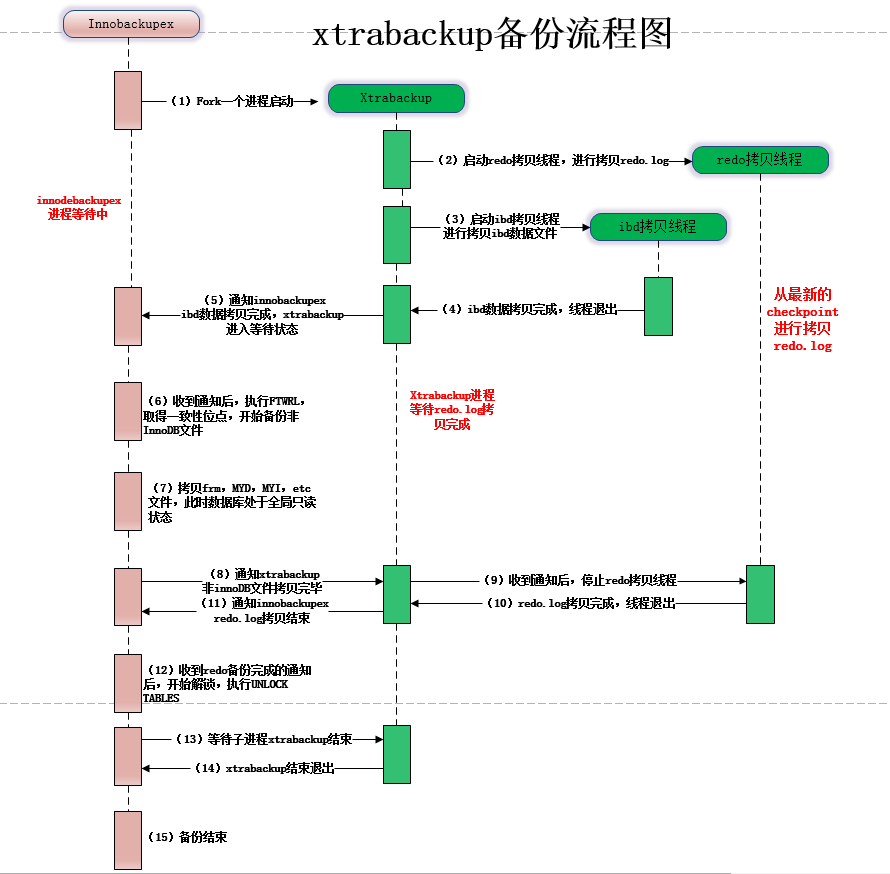
Mysql不锁表备份之Xtrabackup的备份与恢复
一、Xtrabackup介绍 MySQL冷备、mysqldump、MySQL热拷贝都无法实现对数据库进行增量备份。在实际生产环境中增量备份是非常实用的,如果数据大于50G或100G,存储空间足够的情况下,可以每天进...

详解Mysql的锁机制
一、Mysql为什么要加锁锁机制用于管理对共享资源的并发访问,是对数据库的一种保护机制,也是数据库在事务操作中保证事务数据一致性和完整性的一种机制。当有多个用户并发的去存取数据时,在数据库中就可能会产生多个事务同时去操作一行数据的情况,如果...
发表评论

 SRE实战公众号

